
Woodworking Bench with Lots of Storage
For a while now I have used a makeshift workbench basically consisting of two wonky sawhorses and some leftover boards. Despite the flexibility that this setup offers, there are some significant downsides: first, the stability is simply insufficient. You can hardly clamp any larger, heavier pieces onto it, let alone use it to plane, handsaw or sand wooden pieces – the “bench” is just inadequately light-weight to securely hold down work pieces correctly. Secondly, work-holding mechanisms such as a bench vise, board jacks, or bench dogs lack altogether, limiting the range of possible use cases drastically. Lastly, there is obviously no storage room integrated, so you will unavoidably end up cluttering your workbench with tools and thus upend its initial purpose, the picture of workbench 1.0 is a case in point.
I therefore decided it was time to build a real woodworking workbench with integrated storage which I loosely adapted from Ed Pirnik’s cabinetmaker’s workbench described in Fine Woodworking Magazine (highly recommended by the way!). This design uses the particularly strong mortise and tenon joints, providing a great opportunity to learn some new woodworking skills along the way.
Even though most workbench tutorials (Ed Pirnik’s included) make use of heavy machinery such as a jointer and a planer, I am planning to get away with a limited number of tools as I am only just starting to equip my shop.

Tools & Materials
Here’s what you will need:
A miter saw to crosscut the lumber to length
A regular corded power drill with a drill press stand to pre-drill the mortises using a Forstner bit
A decent set of chisels incl. one mortise chisel to cut out the mortises
A Dozuki-style Japanese pull saw which is great for cutting tenons
A random orbital sander – using 120 to 220 grit sandpaper for finishing
A mallet or soft-faced hammer to assemble the base
Parallel clamps to assemble the workbench
In terms of materials, you’ll need the following:
Retractable workbench caster set to be able to move your bench around
2 front vices to securely hold down your workpieces
Heavy-duty full extension drawer slides for your cabinet drawers
Bench dogs as another hold-down system, they come in handy to plane boards
Wood for the legs, stretchers and trestles (hardwood like maple or ash would certainly be best, I only had pine available)
A hardwood table top, mine is oak
Step 1: Planning & Sketch
First order of business was to determine the desired final dimensions of the workbench. I took into account the work height I feel most comfortable with (turns out to be 93 cm, myself measuring 186cm), then the overall length and width of the bench that fit to my limited garage floor space before comparing those requirements with either already available or easily “procurable” material. I then used SketchUp to draw a sketch of the bench. If you are not yet used to this software, I highly recommend it – not only does a digital representation of your build help visualize drafts, iterate designs and figure out dimensions and proportions, it can also be used to derive precise cut lists. Generally, this is time well invested upfront to avoid time-consuming errors in the shop due to miscalculations

Step 2: Assembling the Bench Top with Aprons
The future workbench top basically consists of a table top (see component in blue on the sketch below) and aprons on each long side (in bright blue). Now one way to assemble a bench top would be to build one from scratch, typically by milling strips of hardwood and gluing them together. But apart from the time involved, this usually requires the use of heavy milling machines such as a planer and a jointer. To avoid the use of such expensive kit, I simply bought a readily available 3,8 cm thick oak hardwood table top, the ones that are often used for kitchen countertops. After ripping it to length, I also cut two thinner strips off the oak table top to use as aprons that will be attached to the sides of the bench tops. Aprons are useful not only to provide additional stability and prevent the table top from twisting, but also to add additional clamping and hold-down possibilities such as holes for bench dogs.

A tricky part – for me at least – was for the apron to be correctly aligned with and attached to the bench top, using dowels and glue. My solution was to use some blue painter’s tape as a “spacing jig” to determine the distance between each dowel hole. I simply glued a strip of tape on each edge of the table top, used an awl (a nail would do, too) to poke holes in the wood beneath and then transferred this tape on the apron and reproduced the spacing thereon with the same procedure, making sure to precisely attach the tape. Proceed by drilling the holes in which to insert the glue and the dowels, a drill with a depth stopper comes is really useful for this part. Make sure to dry-fit your components before the glue-up to be able to correct any mistakes – I had to widen the diameter of a couple of holes slightly to make all dowels fit.

Step 3 : Cut the Base Components
The base of the workbench is composed purely of pine wood. If you can get your hands on some hardwood such as ash or maple, this would obviously be better, but I just used what I had basically laying around. The following elements make up the work bench base and were roughly cut to length on the miter saw:
2 bottom trestles (or feet if you will, see green parts on the sketch) and 2 top trestles (in purple) on which the bench top will eventually rest. For those trestles I used some relatively thick wood (6,2 cm x 6,2 cm) I had recently pulled out of the household waste recycling center (highly recommended by the way to get free and often perfectly usable wood!).
4 legs (orange parts) : 6,6 cm x 4,3 cm
4 stretchers (yellow parts) 6,6 cm x 4,3 cm, crucial for the stability of the bench. The drawer cabinets will also rest on the bottom stretchers .

Step 4: Adding Mortise & Tenon Joints
To actually connect the base components, I used mortise and tenon joints which have been around in woodworking for thousands of years and which are supposed to be particularly sturdy to withstand both twisting and horizontal & vertical forces typically applied during hammering, chiseling or planning. They are basically composed of a tenon portion (see yellow part) that works as a peg and a mortise part which has a hole, or a slot, in which the tenon is then inserted and glued in place. I used the following mortise sizes for the top and bottom trestles:
Length: 5,6cm
Width: 3,2cm
Depth: 2,8cm
The size of the leg mortises is slightly different :
Length: 5,5cm
Width: 3,1cm
Depth: 2,9cm
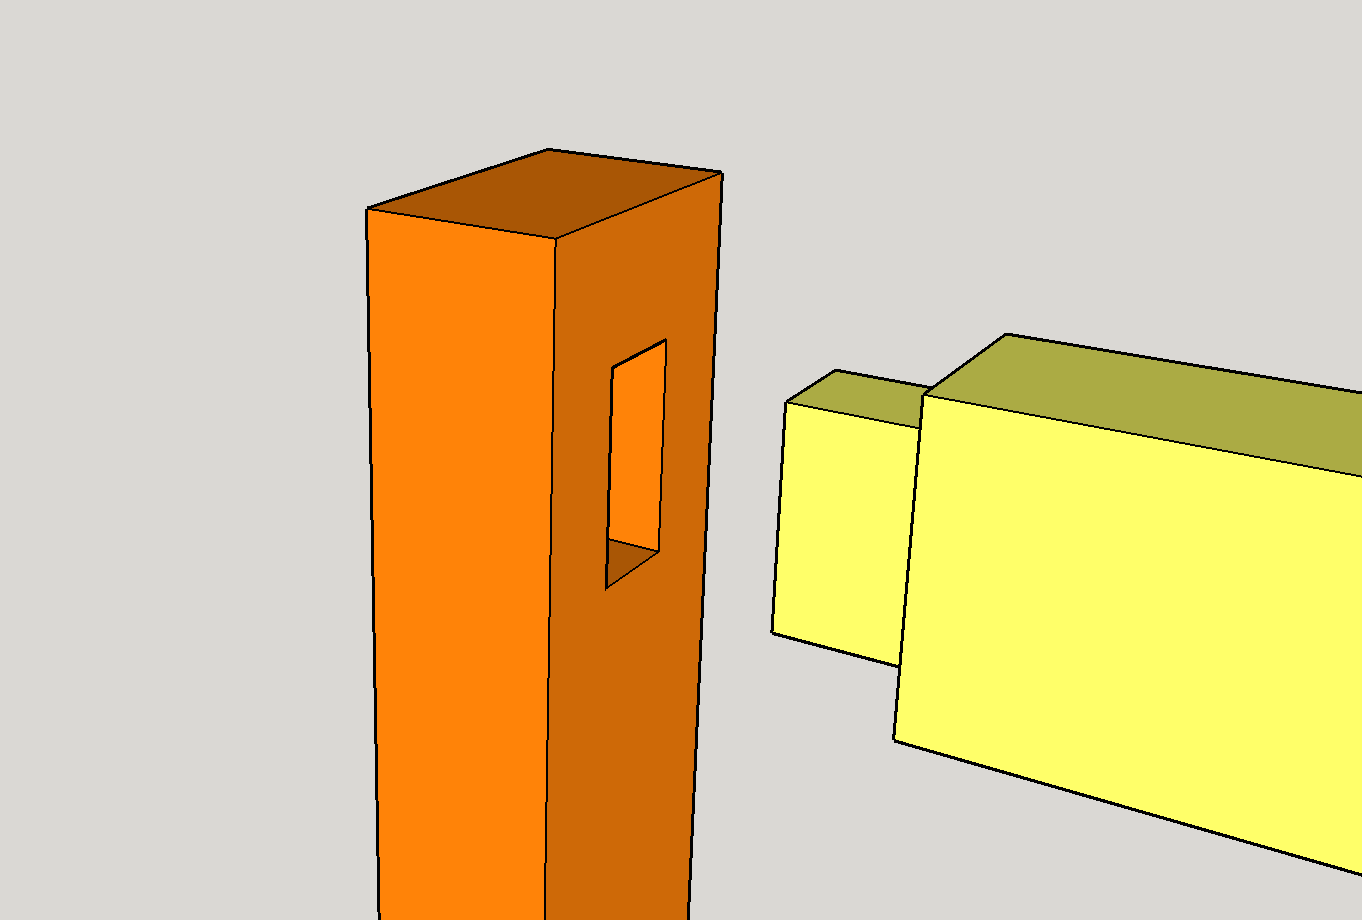
Mortise and tenon joints obviously need to be custom-made for each other specifically. You should aim for a tight fit but should be able to disassemble the parts after a dry fit. I would recommend that you start with your mortises to be able to “sneak up” to the exact size on the tenons. To cut the mortises, I marked out the locations with a pen and cut out the major parts of the holes on the drill press using a forstner bit. Make sure to use some sort of depth control to cut the mortises consistently, for example by adding some tape to the forstner bit.

To cut the tenons, there are certainly a ton of ways on the table saw or even a router, but hand tools produce less dust and I found an easy and quick, yet accurate way to cut tenons is by marking the dimensions with a marking knife and then to simply use Japanese pull saw to get rid of the excess wood. These saws have a particularly thin blade which can easily follow the line cut with the marking knife.

Wherever possible I reinforced the mortise and tenon joints with hardwood pegs. “Pinning” the joints locks the tenons in place and adds a lot of stability.


Step 5: Assemble the Base Components
When all mortises and tenons are cut, make sure to perform a dry fit to see if all parts come together without any issues before the glue-up.

For the actual glue up, I proceeded step by step (mainly due to a lack of clamps) and glued first the leg assemblies and then the stretchers.

Step 6: Attach the Bench Top and Front Vice
Now the time has finally come to mate the base with the table top. In order to securely fix the top, I predrilled the top trestles and used 4 heavy-duty lag screws to attach the bench top to them. I also added some bench dogs which are really useful to use in combination with your vices to hold down workpieces, for example for planning or chiseling jobs.

The way to install the vices will depend on the type of vices you’ll choose, mine is a pretty standard but solid front vice with four attachment points which are fastened with screws directly to the underside of the worktop. Below a sketch from the one I used including its measurements (in mm). While you certainly can build your own wooden jaw and handle for the vice, I didn’t bother and bought them directly with the hardware. Once the vice was attached I screwed the wooden jaw tightly to the front vice, making sure to align the height correctly.

Step 7: Building Drawer Boxes and Drawers
Next up is the construction of the drawer boxes and actual drawers that will be used to store a ton of tools and accessories. Everything typically used on a workbench such as chisels and planes shall be available right underneath the bench. The drawer boxes are basically just two cabinets made from plywood, glued and screwed together with pocket holes and installed one next to the other. It would certainly be possible to build one large cabinet but due to the sheer size, doing so would make the cabinet rather cumbersome to handle and fit in place.
The exposed raw plywood edges of the cabinets looked a bit ugly so I decided to cover them with thin strips of solid pine wood - a process also known as edge-banding. I simply mitered the pine strips and glued and fixed them with pin nails, which are so thin that they are hardly noticeable.

For the drawers, I used simple butt joints reinforced with screws. At first I did not apply any glue in case adjustments had to be made when fitting the drawer slides (which turned out to be necessary a few times to). When calculating the drawer sizes, you obviously need to take into account the width of the two drawer slides attached to each side. I went with heavy-duty full extension soft-close slides and can recommend them highly. After installing all drawers, I then cut out the false drawer fronts out of plywood. Those fronts are basically there to cover the open gaps and slide hardware. They are mounted with screws from the inside of the drawers. Aligning them is a bit tricky, I found using playing cards worked perfectly to space the drawer fronts evenly.

Step 8: Sanding & Finishing
Since this is a workbench, I didn’t go all in with sanding but simply made sure there were no sharp edges and wood fibers sticking out, working my way up until 220 grit on the orbital sander. I removed any remaining dust with a tack cloth before applying the finish.
I chose Danish Oil because it is easy to apply, provides some water protection and dries to a hard, satin finish that is very easy to maintain. Also, this type of finish won't make your worktop shiny like varnish, it will simply enhance its natural looks, make the wood colors pop out well and darken the wood slightly. I applied it with a cloth, making sure to wipe off any excess oil with a clean cloth 30 min after the application to prevent the surfaces from becoming sticky.
Result
