
Building a Tropical Terrarium for a Veiled Chameleon
Hi there!
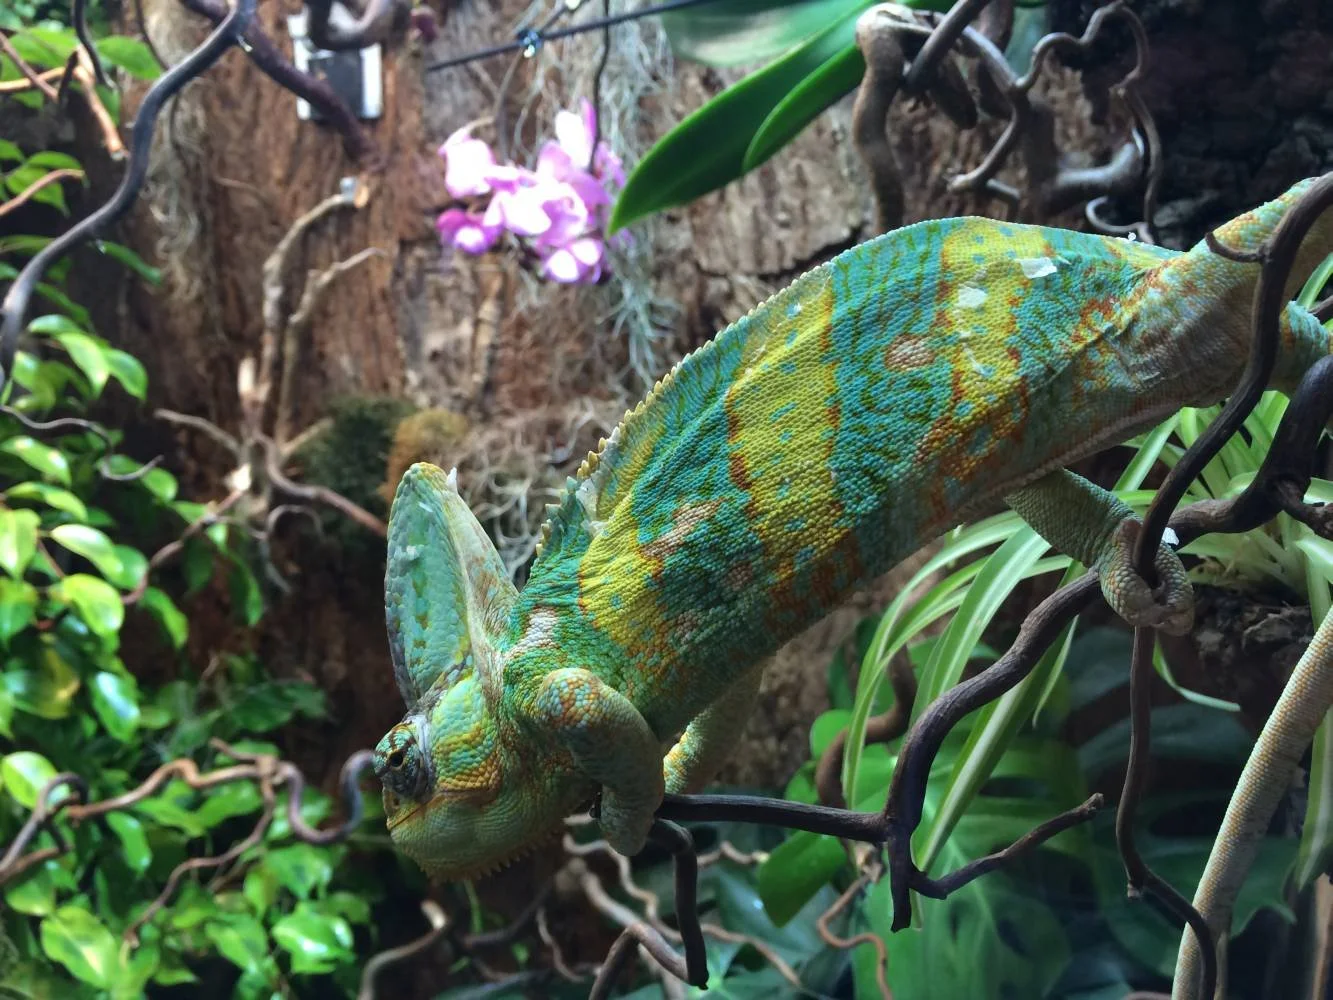
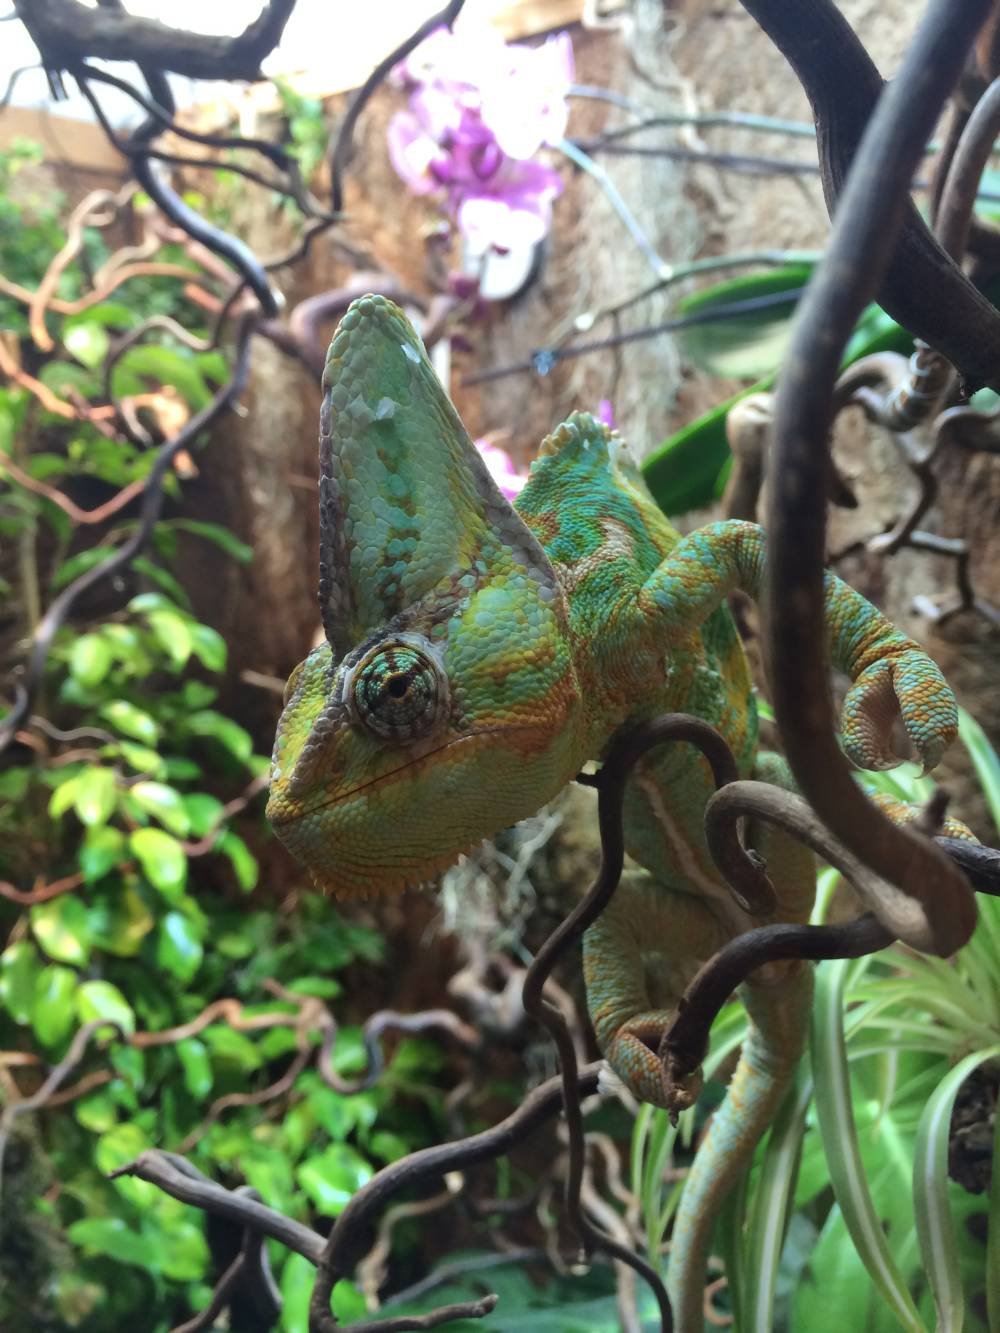
I am a huge fan of chameleons, those intriguingly-looking ancient lizards with an evolutionary history dating back over 60 million years. They are one of the most highly specialized species to wander the earth and demonstrate distinct features such as 360 degrees vision (thanks to laterally positioned eye sockets), color change or shooting their tongue to capture prey, to name only a few.
A while ago I adopted a baby male veiled chameleon which has now outgrown its juvenile terrarium. This build is therefore dedicated to creating a new terrarium for the little fella, covering the entire process from the planning phase, climate control, material choices, sketches to the actual construction of the terrarium and its elements. I will link to all tools & materials should in case you’re interested.
Here are the tools you will need:
A cordless power drill (to pre-drill holes) and an impact driver (to drill the screws), having both will save you a lot of time swapping bits
A random orbit sander with regular 120 grit sandpaper to round over any sharp edges
Screwdrivers to assemble the electronics
A good quality caulk gun to apply the silicone
A jigsaw for the cutouts in the front and side panels
A hot glue gun to quickly attach decoration pieces inside the terrarium
Planning Phase
I want to point out that before adopting any animal, sufficient research time should be invested to make sure that the adequate living conditions can be provided. This is an advice I shamefully neglected on my first try at chameleons so I have the firm intention to correct this error. For anyone interested in chameleons, I highly recommend Petr Nečas’s book „Chameleons – Nature’s hidden jewels“.
The objective for this build is to create a terrarium which can hold a micro climate suitable to this particular chameleon species, which is naturally decorated and in which real plants may grow. The construction shall be water-resistant, solid, yet movable (in case I should have the foolish idea to move with this terrarium at some point). The goal is to have a tiny piece of rainforest inside my home, a calming oasis to watch little Pedro - as we call him - grow, climb and hopefully thrive. As a minimum size requirement for veiled chameleons I found the following rough estimate:
Length: 4 times the animal’s adult body size (without the tail)
Width: 3 times the above size
Height: 6 times the above size
An adult veiled chameleon can grow to 25 cm in size from head to torso, therefore a minimum size of 100 x 75 x 150 cm (L x W x H) is recommended. More is obviously better, but with growing height it becomes difficult to achieve sufficient light intensity, in particular in the bottom areas. Therefore I will limit the actual „climbing area“ height inside the terrarium to 1,50m. Combined with a bottom substrate of around 30cm (to allow a possible future female companion to lay its eggs and plants to grow), a box at the top for the light (another 30cm), plus the base cabinet (25cm) for equipment such as pumps and food supplies I am planning with the following outer dimensions, which happen to just about fit through most doors & windows:
Length : 120cm
Width: 80cm
Height: 235cm
Climate
The veiled chameleon is home to the Arabian Peninsula and tropical to sub-tropical climate characterized by relatively high humidity and temperatures as well as extended periods of sun exposure. These conditions need to be simulated as closely as possible within the terrarium. In order to achieve the necessary humidity, natural plants and an overhead sprinkling / misting system are suitable. Especially for „heliophylous“, or sun-loving, reptiles such as chameleons, a sufficient lighting regime is absolutely vital. The various light sources do not only provide the necessary brightness and UV rays, but also the required temperature. I chose the following 3 lighting elements:
Fluorescent tubes for basic illumination of the cage. I chose tubes with 5800 Kelvin, as this light color is considered natural light close or the sun’s light color. You’ll also need a lamp fixture to hold the tube which typically comes with an electrical ballast to limit the amount of current for the lamp’s circuit
Spotlights to locally increase light intensity and heat. Thanks to their limited light cone, only a part of the terrarium is illuminated and heated, providing formidable basking spots. Make sure to get a ceramic socket with reflector as those spot lights generate lots of heat.
A dedicated UV lamp + corresponding socket. The presence of ultraviolet waves is supposed to have a positive effect on animal wellbeing and Vitamin D synthesis.
By means of this lighting regime, different temperature zones can be achieved inside the terrarium that are important for the animal. During daytime, the bottom area should have temperatures of around 20⁰C, in the middle area 25-28⁰C and in the top area close to 30⁰C. Directly under the spotlights, the basking spots should locally reach 35⁰C. During night time, the temperatures should drop significantly, but not below 10⁰C.

Author : rbrausse, under IUCN Red List license
Material Choices & Sketches
I have chosen 18mm phenolic resin coated plywood for the actual terrarium cabinet and 6mm sliding glass doors for the front. Phenolic plywood has the advantage of being water-resistant. No need therefore to use additional (expensive and possibly toxic) epoxy or some lacquer to seal the surface as would be required for say OSB panels. A terrarium made solely of glass seems not suitable due to the high weight, mirroring effects that can lead to permanent stress for the animal, let alone the lacking flexibility to integrate ventilation inlets or water drains.
For the lighting box on top of the cabinet I am using a rather lightweight 8mm Baltic birch plywood.
The base cabinet is made of 18mm glued laminated beech hardwood.
To complete the components list for the cabinet:
I use a stainless steel mesh (it needs to be at least stainless to avoid rust) for the terrarium cabinet top, front and side faces to allow sufficient air circulation
Aquarium silicone helps to seal and waterproof all joints. Avoid common silicones as those may continue to emit toxic components, this one is 100% solvent-free and non-toxic.
Plastic W-profiles as sliding tracks for the glass doors.
Casters to be able to move the finished cage which I expect to be rather heavy

Cabinet Construction
Since I lack the necessary woodworking tools (e.g. track saw or table saw), all wood and sheet goods were bought and (more or less) precisely cut to above dimensions in a nearby big box store. The parts are then simply glued in place using basic butt joints and secured with predrilled and countersunk wood screws while paying particular attention to square alignment of all panels using square clamps.
Bottom Cabinet
The bottom cabinet holds all technical equipment and accessories such as electrical sockets, timers, the pump and water tank for the water sprinkling system, a drain tank, food supplies etc. Hereafter a view of the bottom cabinet lacking only the top panel. Note the opening in the back which will allow hoses for the sprinkling system as well as electrical cables to be installed. I then mounted supporting blocks in all corners and in the middle of the base cabinet for additional stability and added a small light strip before fixing the cables with cable clamps.
I added a total of 5 casters to the bottom of the base cabinet to be able to move around the terrarium whenever necessary.


Terrarium Cabinet
The same technique of glued and screwed butt joints is used for the terrarium cabinet. All cutouts for the ventilation have been done with the help of a jigsaw. Additionally, I sealed all joint edges on the inside of the cabinet with aquarium silicone.
This is how the terrarium cabinet looks like after assembly of the first cork and tree bark panels, which I have chosen not only for their decorative appeal but also because they provide an additional layer of water protection, a climbing surface for the lizard while storing heat and humidity.

Hereafter a view inside the cabinet from above, the hole in the bottom panel will later serve as a water drain to avoid that water accumulates in the bottom.

Then the pond liner is glued in place on the bottom, making sure that all 4 sides were sufficiently covered as well. To avoid any water ingress behind the liner, I glued an additional overlapping layer of cork sheets on top.

I didn’t like the brownish look of the phenolic plywood on the outside of the cabinet, so I covered all exterior faces with a self-adhesive, wood-patterned shelf liner. A heck of a hassle to glue it in place, but I reckon it was worth it. The liner’s adhesive sticks very well to the plywood, no additional glue needed. Only on the edges I used a thin layer of silicone. A small felt scraper comes in handy to apply some pressure to the liner and to make sure no air pockets remain underneath.
To give the inside a natural look and provide sufficient hiding places for the little chameleon, I opted to install plants on the side and back panels as well. On the below picture you can already spot the first plant pot attachments. The bigger ones are resting one small wood pieces mounted with metal brackets to the cabinet sides. From some leftover tree bark, I broke off some smaller pieces and concealed the pot and brackets with bark pieces using a hot gun (see left side of the picture).
In the upper opening of the cabinet I have installed wooden frame with an aluminum bar in the middle (for reinforcement) for the steel mesh to rest on.

Aeration
In total 3 openings - in the front and right side panels as well as the top of the cabinet - shall ensure air circulation as chameleons do not tolerate steady air. By above arrangement I hope to achieve a chimney effect, with cold, fresh air entering in the bottom and spoiled air exiting from above.
In bottom stretcher located in the front side of the cabinet, a hole measuring 11 x 110cm is cut out and covered by a perforated metal plate. On the right side panel, a cutout of 30 x 60cm will be covered by steel mesh. Below that, another small cutout will hold an electrical ventilation, which will actively suck fresh air into the cage in regular intervals. The ventilator is covered from both the inside and the outside with perforated plates, to ensure no foreign objects, insects or chameleon limbs may end up in there. The electrical cable for the ventilator goes behind the cork panels and connects to a second ventilator which rests on the mesh installed on the top opening to blow the air out of the terrarium. The ventilators will be activated automatically by a timer for 5 minutes per hour to further increase the chimney effect and introduce fresh air in the terrarium.
The entire top side of the terrarium cabinet is covered with steel mesh which rests on the previously mentioned wooden frame structure. To do so I have generously pre-cut the mesh (works just fine with regular scissors) leaving some overlap before attaching it to the wooden frame with a stapler while tensioning the mesh to avoid any weird-looking sag.
The remaining projecting mesh can then be cut off. I have left around 1 cm of stock after the staplers which I then bend over and seal with silicone to avoid unwanted escapes and mesh wires to protrude.


After having done the liner and the top mesh, the perforated metal plate in the front and the mesh for the side panel can be installed.
Also the plastic “W” profiles which will house the sliding glass doors can now be attached using silicone. Make sure to use profiles with a low height at the bottom and a bigger height at the top to prevent the glass doors from falling out.

Lighting Cabinet
All lighting fixtures, lamps, cables, electrical sockets etc. are stored out of harm’s way in the lighting cabinet atop the terrarium. The steel mesh provides a barrier to prevent good ol’ Pedro from getting too much of a sun tan. I chose the following lights:
1 x 70 Watt Par38 spotlight as a heat source
1x 80W HQI-spotlight with electrical ballast for sun-like
1x 70W Lucky Reptile Bright Sun with electrical ballast for UV rays (here a similar one)
2x T5-fuorescent lamps incl. fixtures and ballasts for basic illumination
The lighting cabinet has the same outer dimensions as the terrarium cabinet. The rather lightweight 8mm plywood turned out to be a bit wobbly, but this was an easy fix with two pine reinforcement bars attached to the top to add further rigidity. In any case I was looking for a way to attach cable and light fixtures in the center section of the lighting cabinet so this solution kind of killed two birds with one stone. All 5 lamps are connected to a high-quality multiple socket capable of withstanding the total wattage. From the lighting cabinet a single cable (the connection end of the multi-socket) is leading down the back of the cabinet towards the bottom cabinet where it is plugged to a timer set to 14 hours of daily lighting.
The exterior faces of the lighting cabinet are then covered with the same adhesive shelf liner as used for the terrarium cabinet. The inwards-facing sides, however, are hot glued with aluminum foil which is supposed to increase the light reflections and thus the light yield within the cage.
During a test run I realized that the electrical ballast can get quite hot, I therefore did not attach them directly to the wood but rather on to small pieces of bend, perforated metal plates so that air may circulate around the ballasts from all sides.
The lamp and tube fixtures all spot reflectors to try and increase luminous efficiency and to direct the light towards the terrarium as much as possible.
I must admit the finished lighting cabinet looks a bit messy, but all cables are securely attached and it works just fine:

Water Sprinkling System
As mentioned, the pump and water tank are located in the bottom cabinet. I chose a Whisper PowerPump capable of 8.5 bar which is fantastic – when turned on you mainly notice the nozzles spraying the water but hardly the pump itself. I recommend to tightly fix the water hose with clamps to avoid any rattling noises due to the pressure building up in the hose which might start to wander around.
Hereafter a picture from the back of the cage, showing the hoses and cables. The white cable on the left is the electrical wire for the ventilator for which I used quick connector plugs in case maintenance of the lighting cabinet requires a quick disconnection.
The water dispensing nozzles are neatly installed just below the steel mesh under the lighting cabinet. You can arrange them anyway you want and even use them to water your plants.
For the water tank I highly recommend two safety features: a particle filter to prevent the system from clogging up (and thus from leaking at some point) and a float switch which senses when a minimum water level is reached and in this case turns off the power supply to the pump to prevent it from sucking in air which may damage it beyond repair.
Hereafter two pictures from the back of the cage, showing the hoses and cables. The white cable on the left is the electrical wire for the ventilator for which I used quick connector plugs in case maintenance of the lighting cabinet requires a quick disconnection.


Interior
Soil
To allow plants to grow and potentially a future female chameleon to lay its eggs in the ground, I plan with a bottom substrate height of 30cm. Before introducing the soil, however, I have once more sealed all edges and corners with silicone to prevent any water ingress behind the pond liner which could damage the wooden cabinets over time and compromise its structural integrity.
The first layer, roughly 5cm, is composed of clay pebbles often used for plant soil drainage. This drainage layer is supposed to hinder the soil from becoming too marshy while capturing water for plant roots and increasing humidity inside the cage. In the event of a leaking sprinkling system or accidental over-watering, surplus water can exit the bottom of the terrarium cabinet via the drain valve installed in the hole pre-drilled earlier (see also sketch) which is hooked to a short garden hose and leads a small water tank located in the bottom cabinet. The drain valve has seals on both sides (the bottom of the terrarium cabinet and the top of the bottom cabinet) which have been additionally sealed with silicone.

On top of the plant granulate, a double-stacked layer of geotextile underlayment serves as a barrier to prevent it from mixing with the plant soil. The soil is mainly “locally sourced” from a nearby forest. This has the advantage of directly introducing living organisms such as worms, bugs, woodlice and other microorganism responsible for recycling any waste material.
Here the result after some gardening work:

Plants
Real plants do not only produce oxygen, improve the room climate, increase humidity levels and use carbon dioxide, but they simply look nice and sometimes even serve as a vegetarian snack to the chameleon. Pay close attention not to introduce any toxic plants which might harm the animal.
I used the following plants:


Results


